How EC2-man saved the load
Contents
Well, I am pretty sure, that everyone who touched the AWS at least once, heard about the main service, which Amazon provides. I mean Elastic Compute Cloud or EC2. It comes with a very cool feature, which allows you to handle a peak load and at the same time absence of load too, adjusting capacity of resources and saving money in the end.
I realized that I have never tried to set up this architecture myself and test how it actually works. I think this article could be considered as a tutorial of how to make a simple autoscaling group with a load balancer in front of it. And in the end, we will load it and either brake or see how autoscaling works.
Let’s get started …

Killing tool
First of all, we would need some applications being deployed on the EC2, to be able to test how the scaling works. Besides, it would be convenient, if our application could simulate different scenarios for loading the instance to get it down.
We are going to create a very simple and dry web application, which provides the next endpoints:
- / - simple hello endpoint, using for health checks
- /session - tricky endpoint, which creates a unique Id for you at the first visit and remembers it in cookies. If later you come with unknown session ID it returns 401 status code.
- /load/n seconds/percent of CPU - generates the load of CPU with % passed for the duration of n seconds.
To generate this kind of simple web application, I used a small but quite powerful web framework javalin and Kotlin. To fake the load of CPU used nice library FakeLoad thanks and respect to Marten Sigwart. The source code of this app you can find in my github rep.
With javalin it is really easy to start, you can write just like that:
|
|
Congratulations, you have a simple REST endpoint, which response “Hi, unknown user!” with http status = 200.
Now, I’d like to simulate the usual web application with some kind of authentication in there.
|
|
where sessions is just a val sessions = mutableSetOf<String>().
When we first time navigate to the /session, we see the Hi, you’ve been granted access! and with every next time or refreshing - Hi authorized user!.
If we restart the server the message this time should be Your session is not known on this server, because the session is not known on this new server.
Now the fun part, the endpoint, which will be trying to kill the server.
|
|
It just runs nice FakeLoads lib with passed path parameters for duration and percent of CPU load.
EC2 instance or solving the trick with deployment
Starting this experiment, I came across to one simple but quite crucial question - how actually I and people, in general, deploy their apps to the pure EC2 instances. Well, God bless you user data in EC2 instance configuration. A custom snippet of a script which you can run on instance first build, looks like enough to trigger some kind of deployment you need. There is a way to build your custom AMI, but this is a too heavy solution for the application development lifecycle, and especially for such a tiny app like mine. Besides, there are some other options, but let’s keep them out of the scope for now.
So, the idea is to build simple jar file with my app, upload it in some AWS S3 bucket, during the EC2 instance start-up in the mentioned user
data copy jar from the bucket and just run it. Looks simple, well, looking ahead it is that simple indeed.
|
|
By the way, if you don’t have the AWS CLI (Amazon command line) installed, this is a right time to do it already.
Now, we need to call it from user data script. But instead of creating an actual EC2 instance, we are going to set up the launch template. This template is being used by every EC2 instance we created, having a similar pre-set for every new starting instance.
|
|
I am using one of default Amazon Linux AMIs, it has only java 7 installed by default. Because of that as the first step in my fancy script,
I am updating the java version to the newer one. After that syncing app folder with S3 bucket.
Besides that, I have also configured the security group for the instance to be able to ssh to it and opened 7000 to access it from the browser. Don’t forget, all that we are doing for Launch configuration and to for the particular instance.
Autoscaling group
Let’s continue to set up our super configuration for handling the killing load.
Now we need to configure the autoscaling group, you can do it right from the Launch template interface:
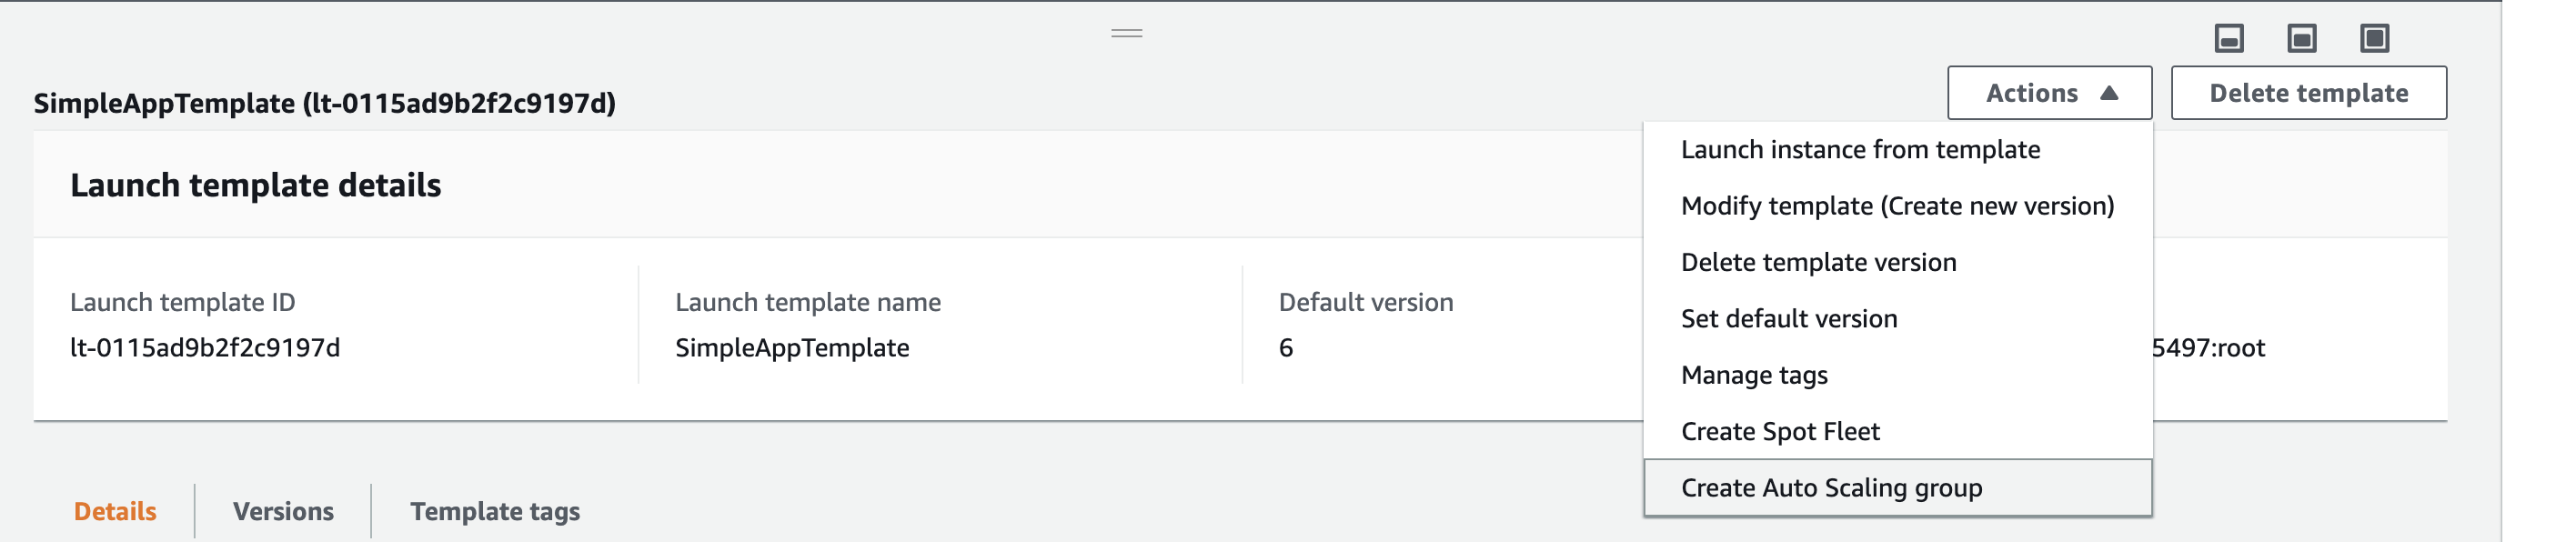
Or directly from autoscaling group menu using Launch template:
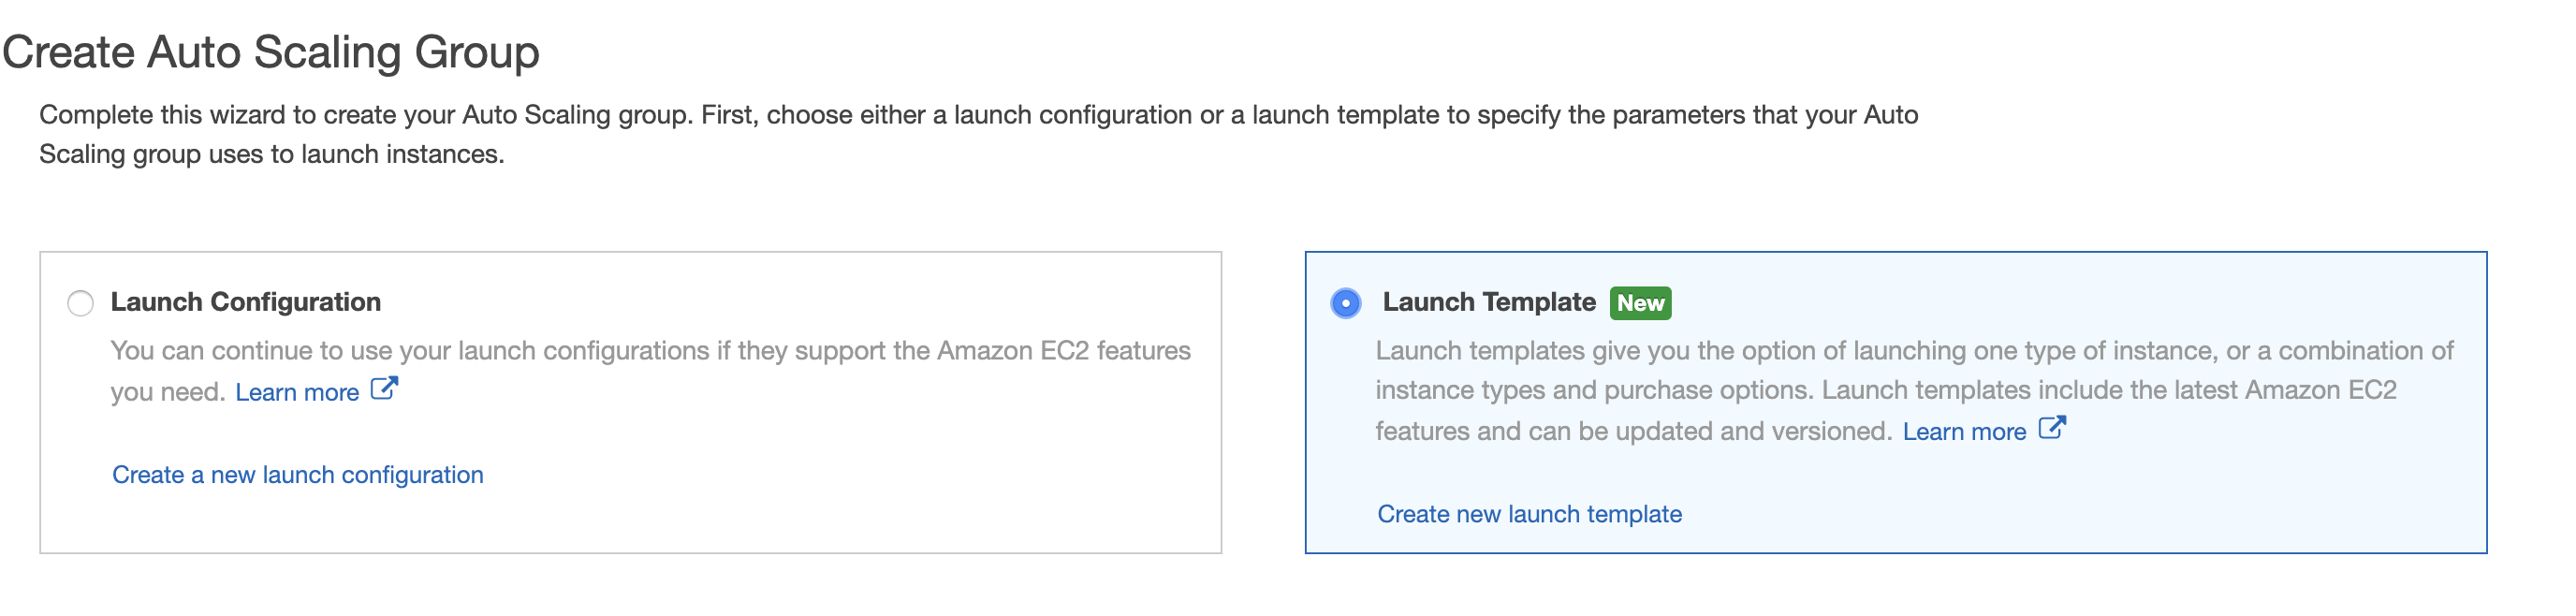
For now, just creating the autoscaling group without scaling policies and load balancer, we will add them later.
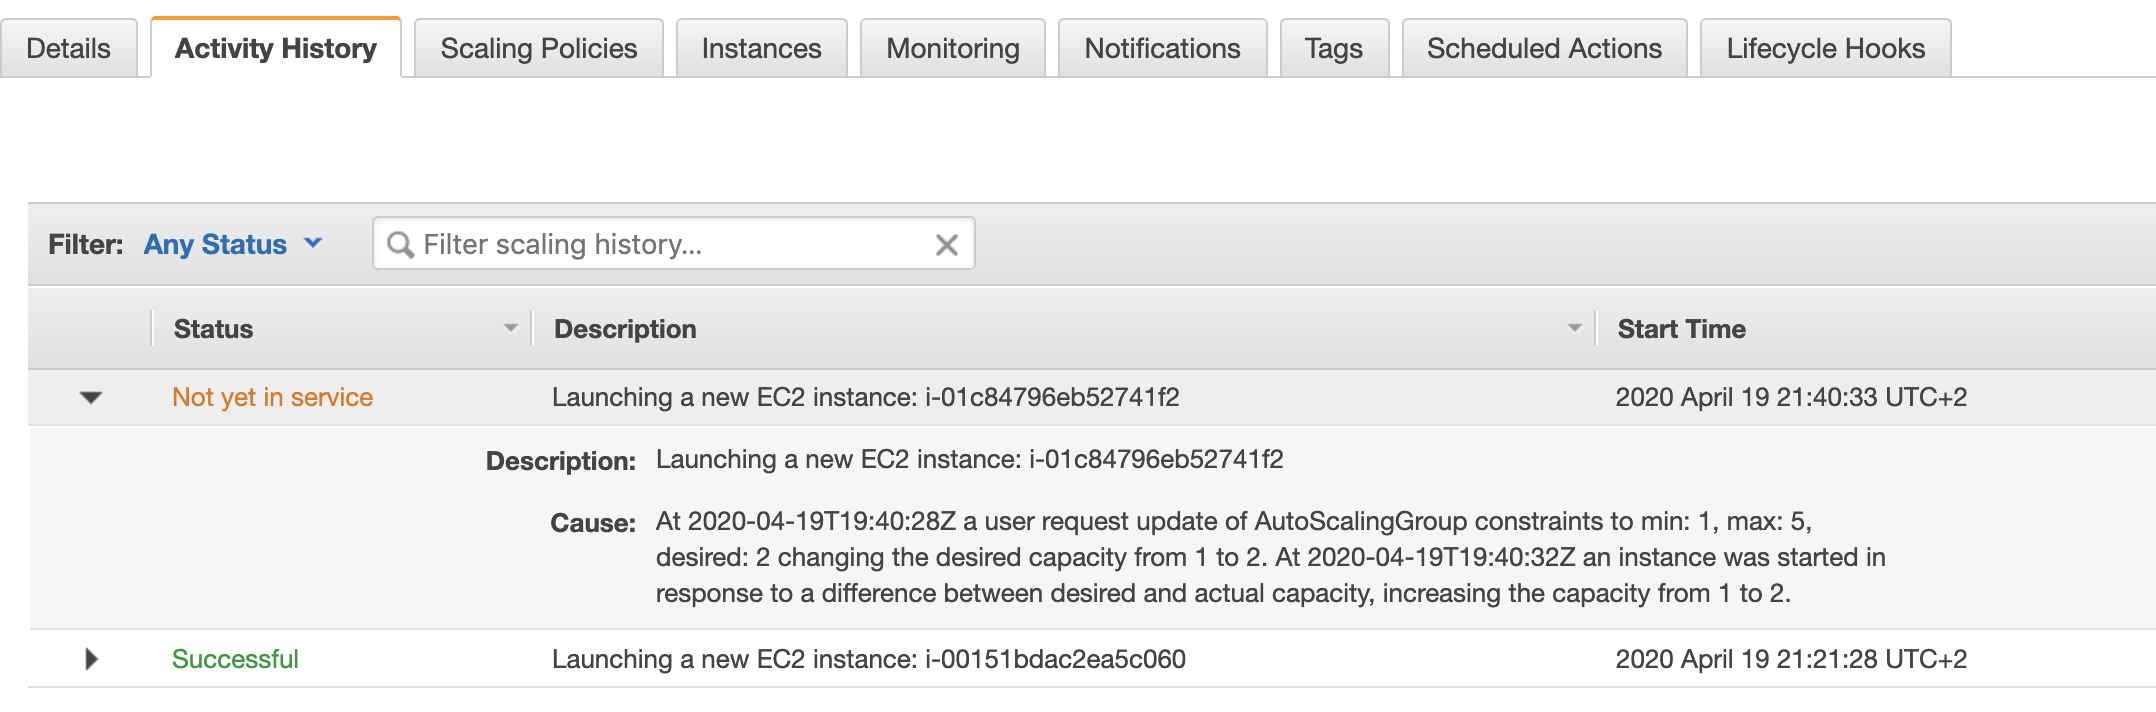
After creating the Autoscaling group, the capacity of the resources is already being managed by the group which you created. By default,
the group has 1 instance capacity as the desired number. If you check the EC2 console, you see one starting EC2 instance. Let’s play a bit,
we can go to the Autoscaling group console and try to edit basic configs for the group we created. Let’s make the maximum of available instances
equal to 5 and desired number 2.

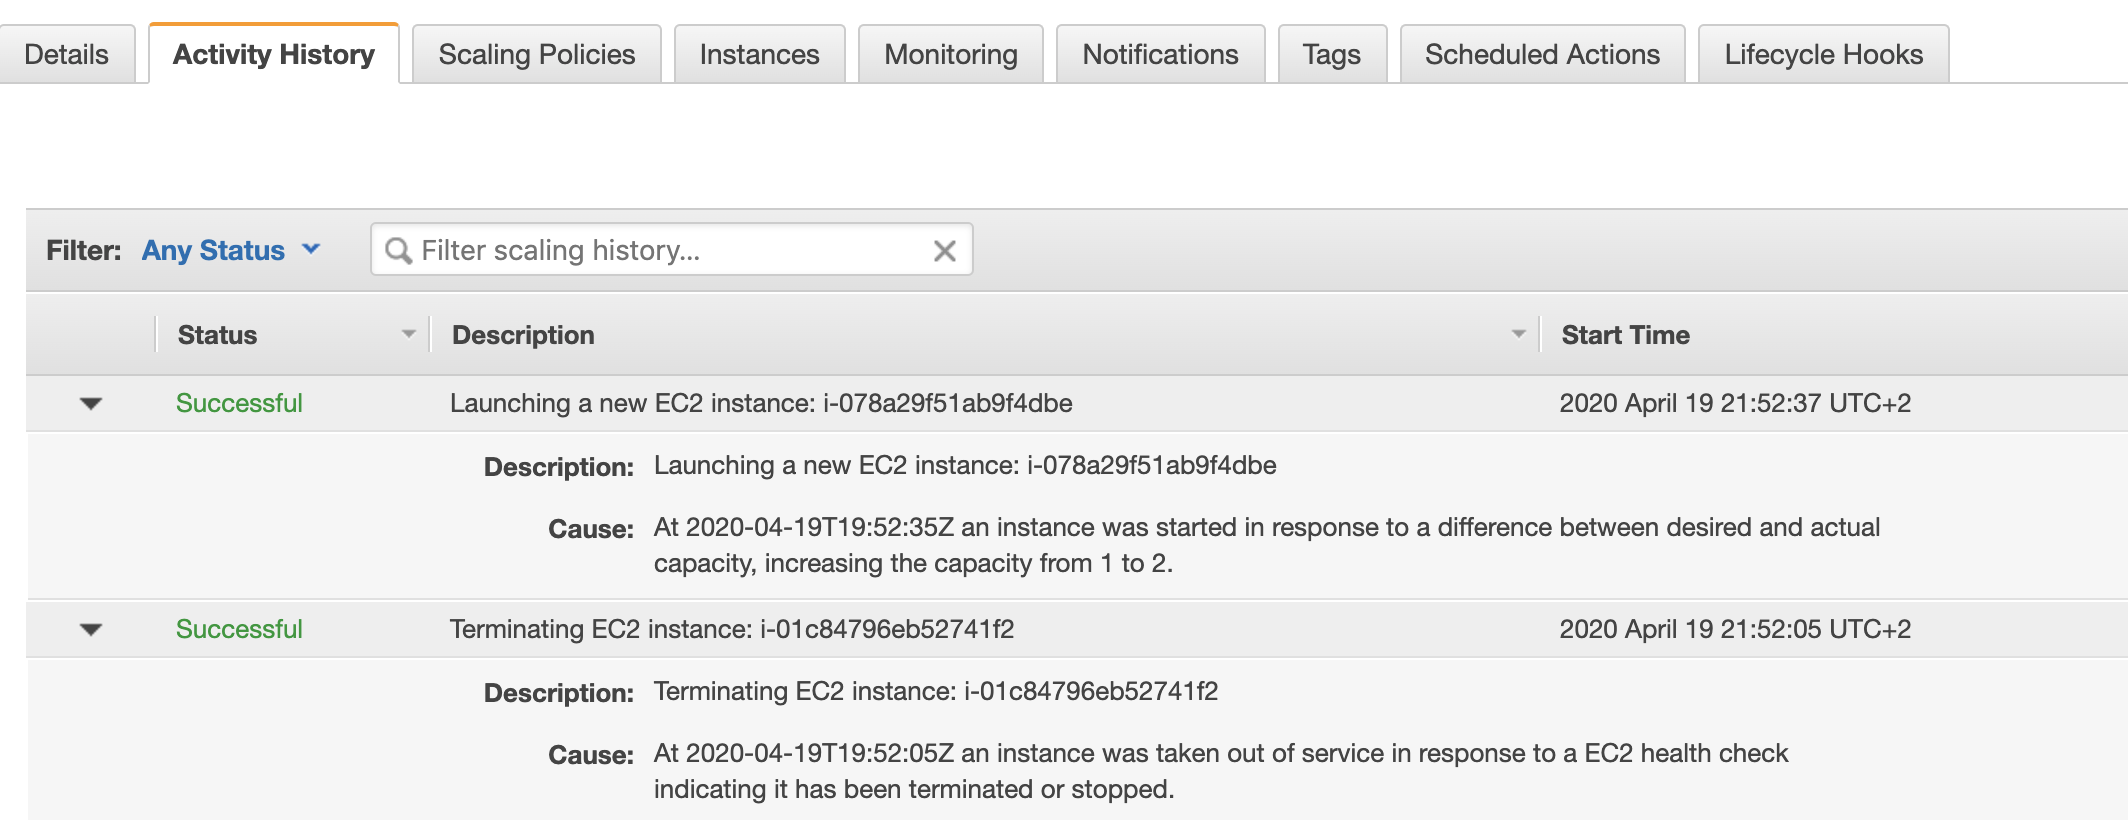
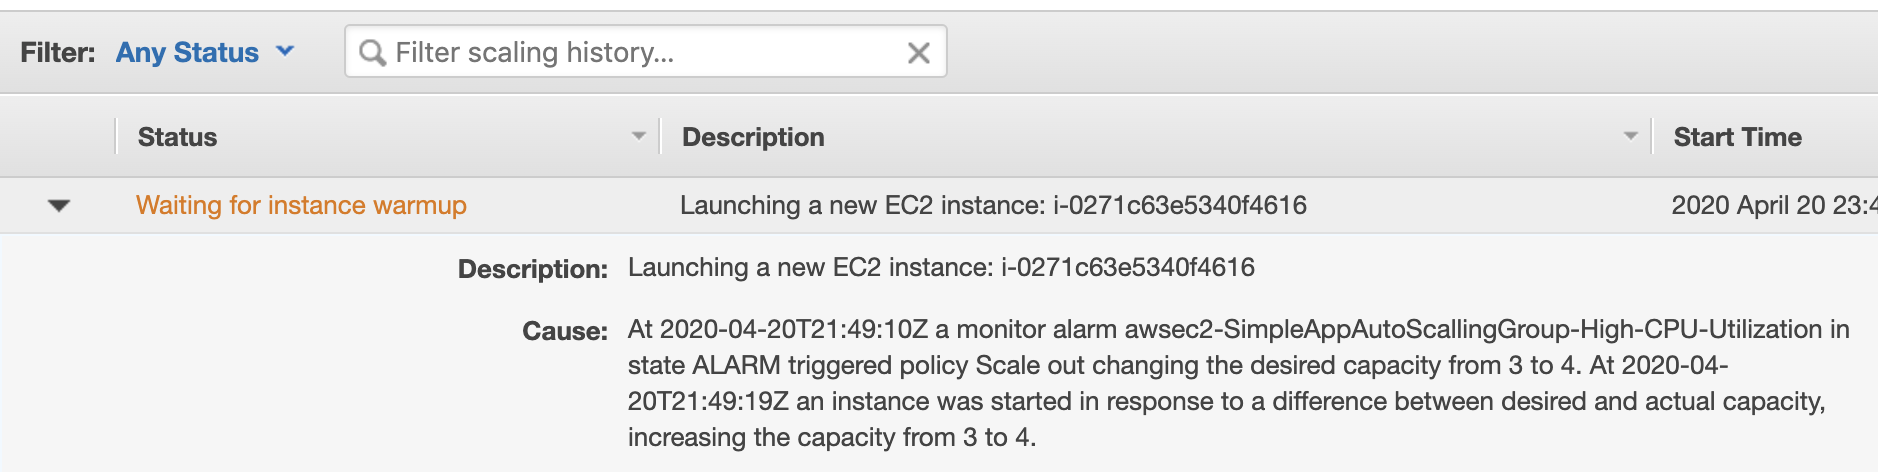
Now, if you navigate to the Activity History tab in the Autoscaling group console, you would see that one additional instance being added to
the group:
Manual termination
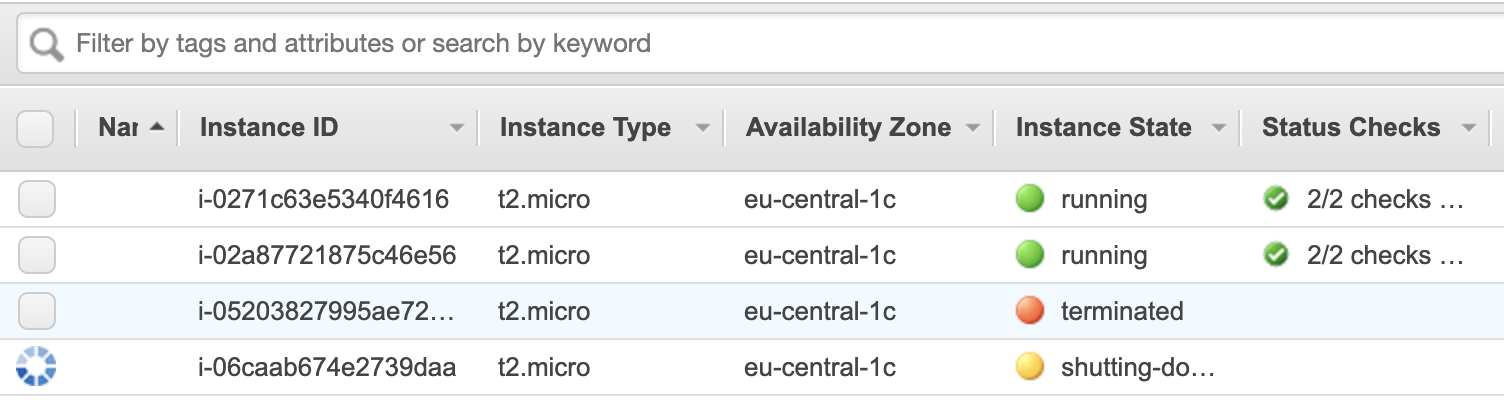
Let’s navigate to the EC2 console and confirm, that now we have 2 instances running.
And at the same time, let’s make the first fun here. I will try to terminate one of the instances, this by idea simulates sudden server failure.
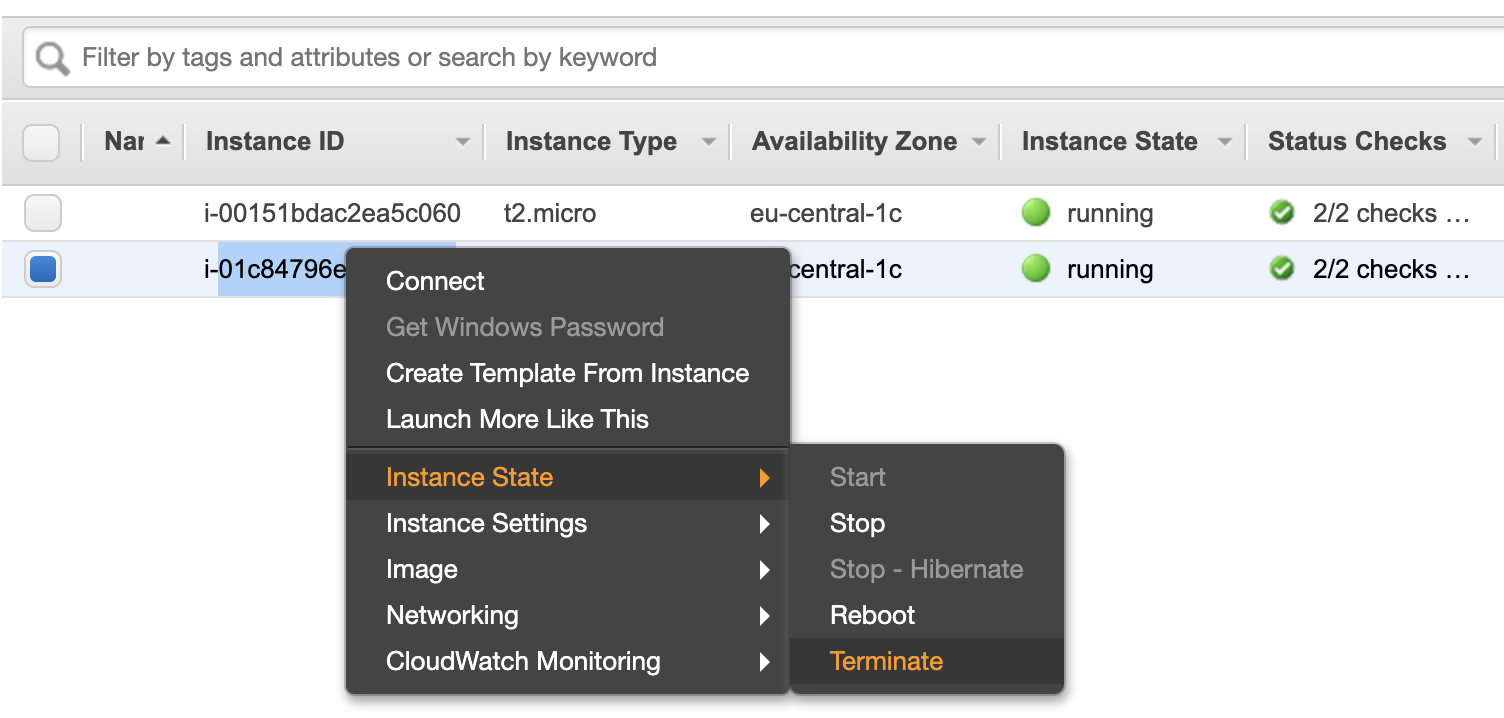
And after a while … Behold, the new server is rebelling to replace the deceased comrade. Well, is it not a miracle?
 and the Activity History tab:
Load Balancer
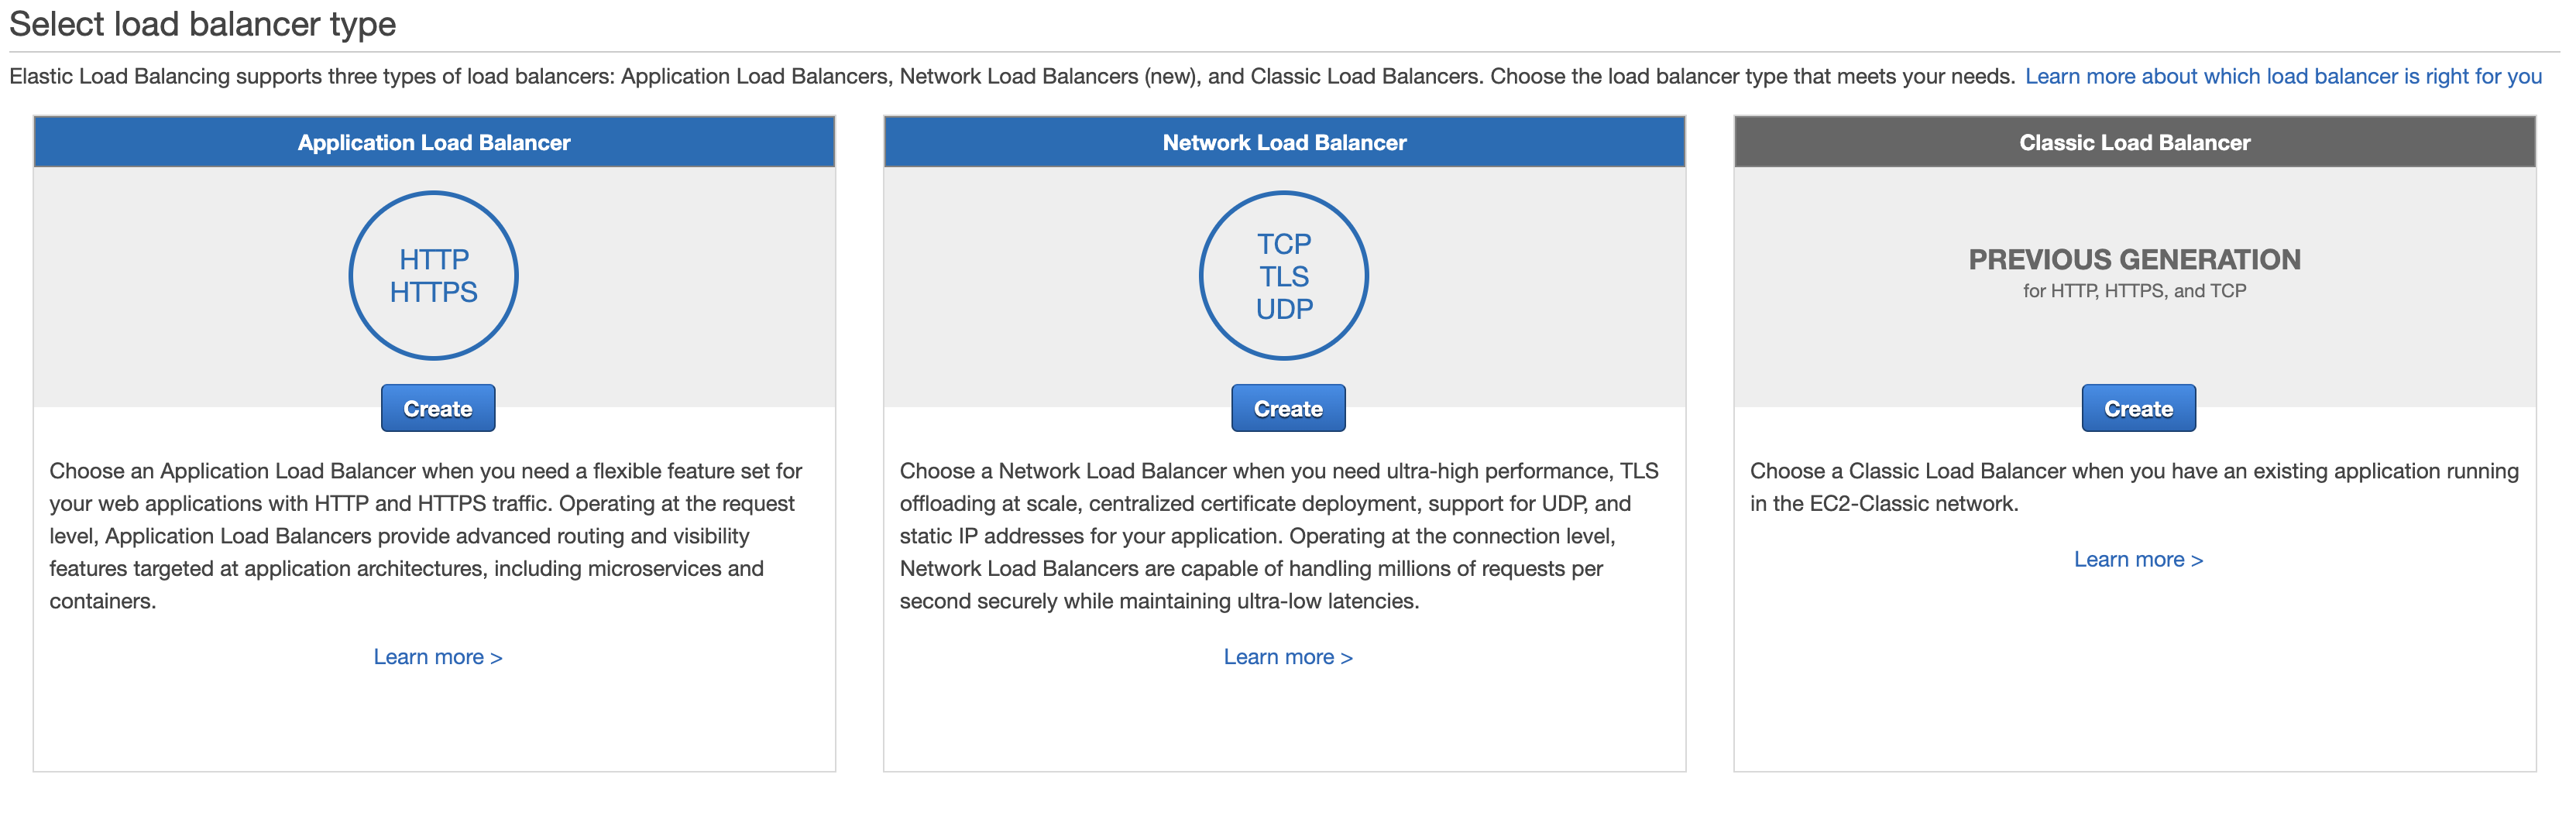
Well, let’s make it even better. Let’s add the Load balancer (LB) in front of our Autoscaling group and try to access our app from the browser.
Navigating to the Load Balancer AWS console, we can see different types of LBs. Let’s select the Application Load Balancer.
Almost for all the steps, you can use default settings, except the security group - you would need SG with port 80 for the LB.
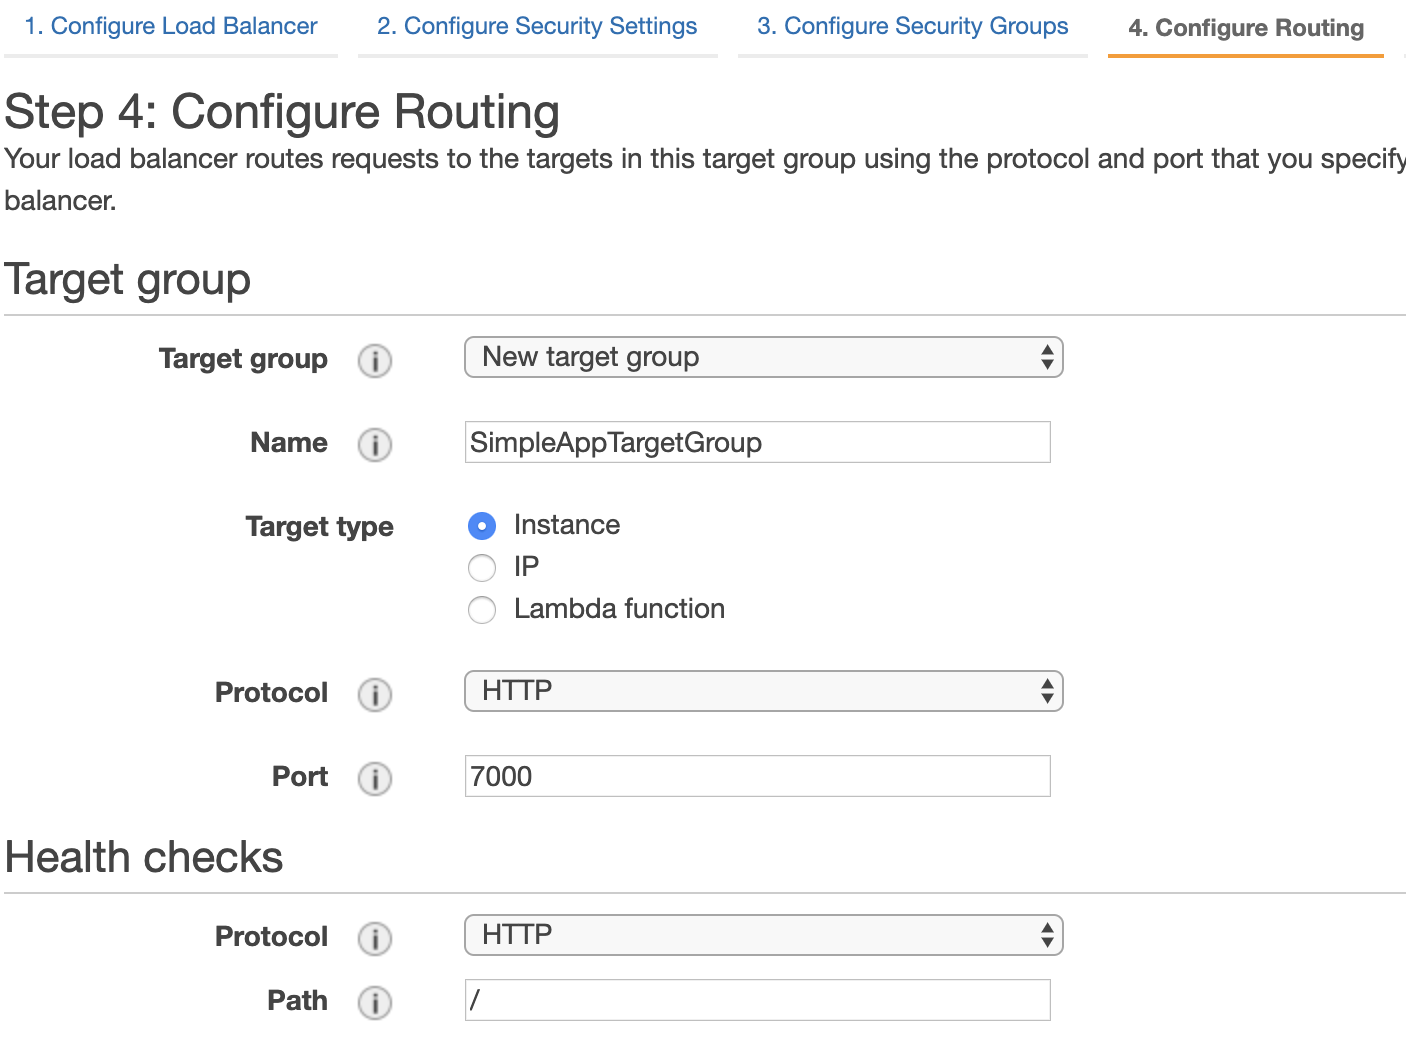
During the step, configuring target group, you need to create a new group searching instances on port 7000, because this is the port,
which we are using in our web application.
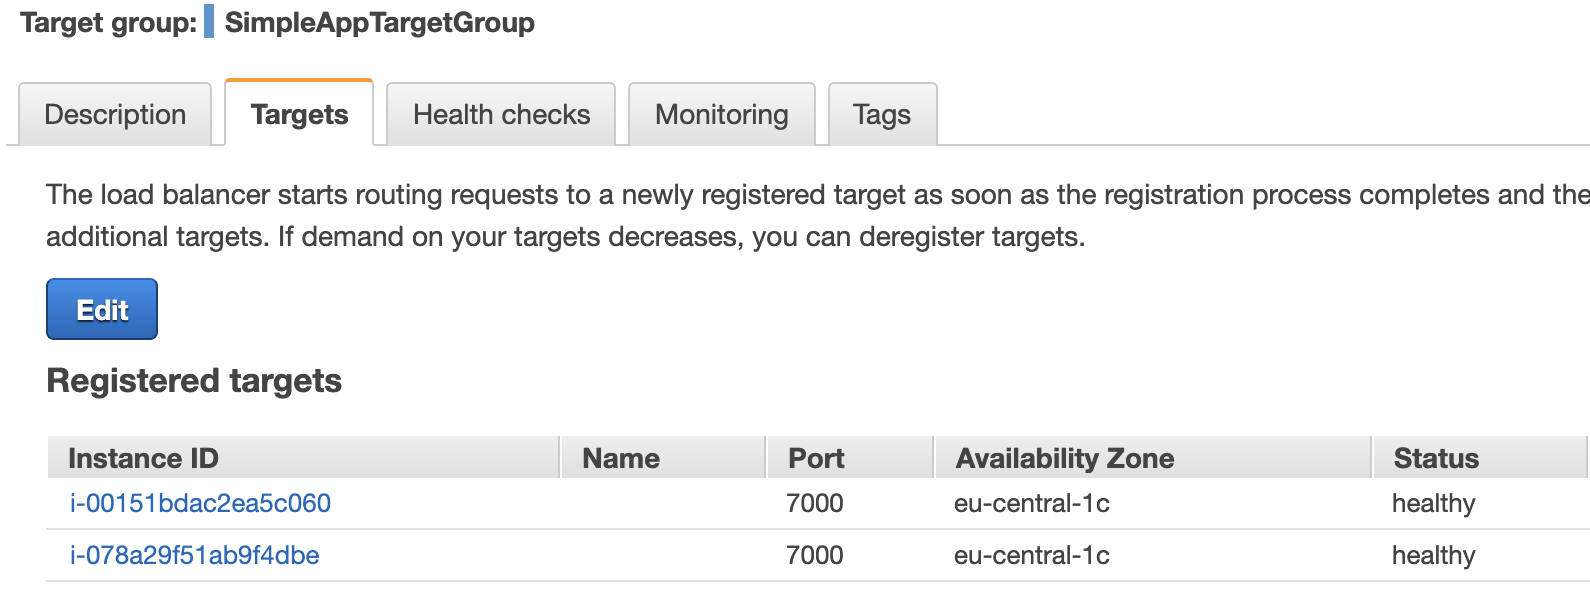
Now finally, we have the LB. It uses the target group to redirect there coming requests. This group listens to the HTTP resources
on port 7000. The last thing we need to do is to attach the Autoscaling group to LB Target Group, this we allow to register
automatically the new instances in the LB target group. For that, let’s find our recently created Autoscaling group and
edit Target Groups property there:

A moment later we can see our 2 EC2 instances in the target grop details of the LB:
Finally, we can go to the LB domain and see our app in action:

Survival policies
Now we need to add some magic to our configuration. We need to train our group to survive the danger of failing comes. Let’configure auto-scaling rules.
If you go to the Scaling policy tab in the Autoscaling groups menu, you can add one or more policies.
There exist a few types of them, you can check documentation
regarding this, but let’s for our case create the scaling policy with steps:
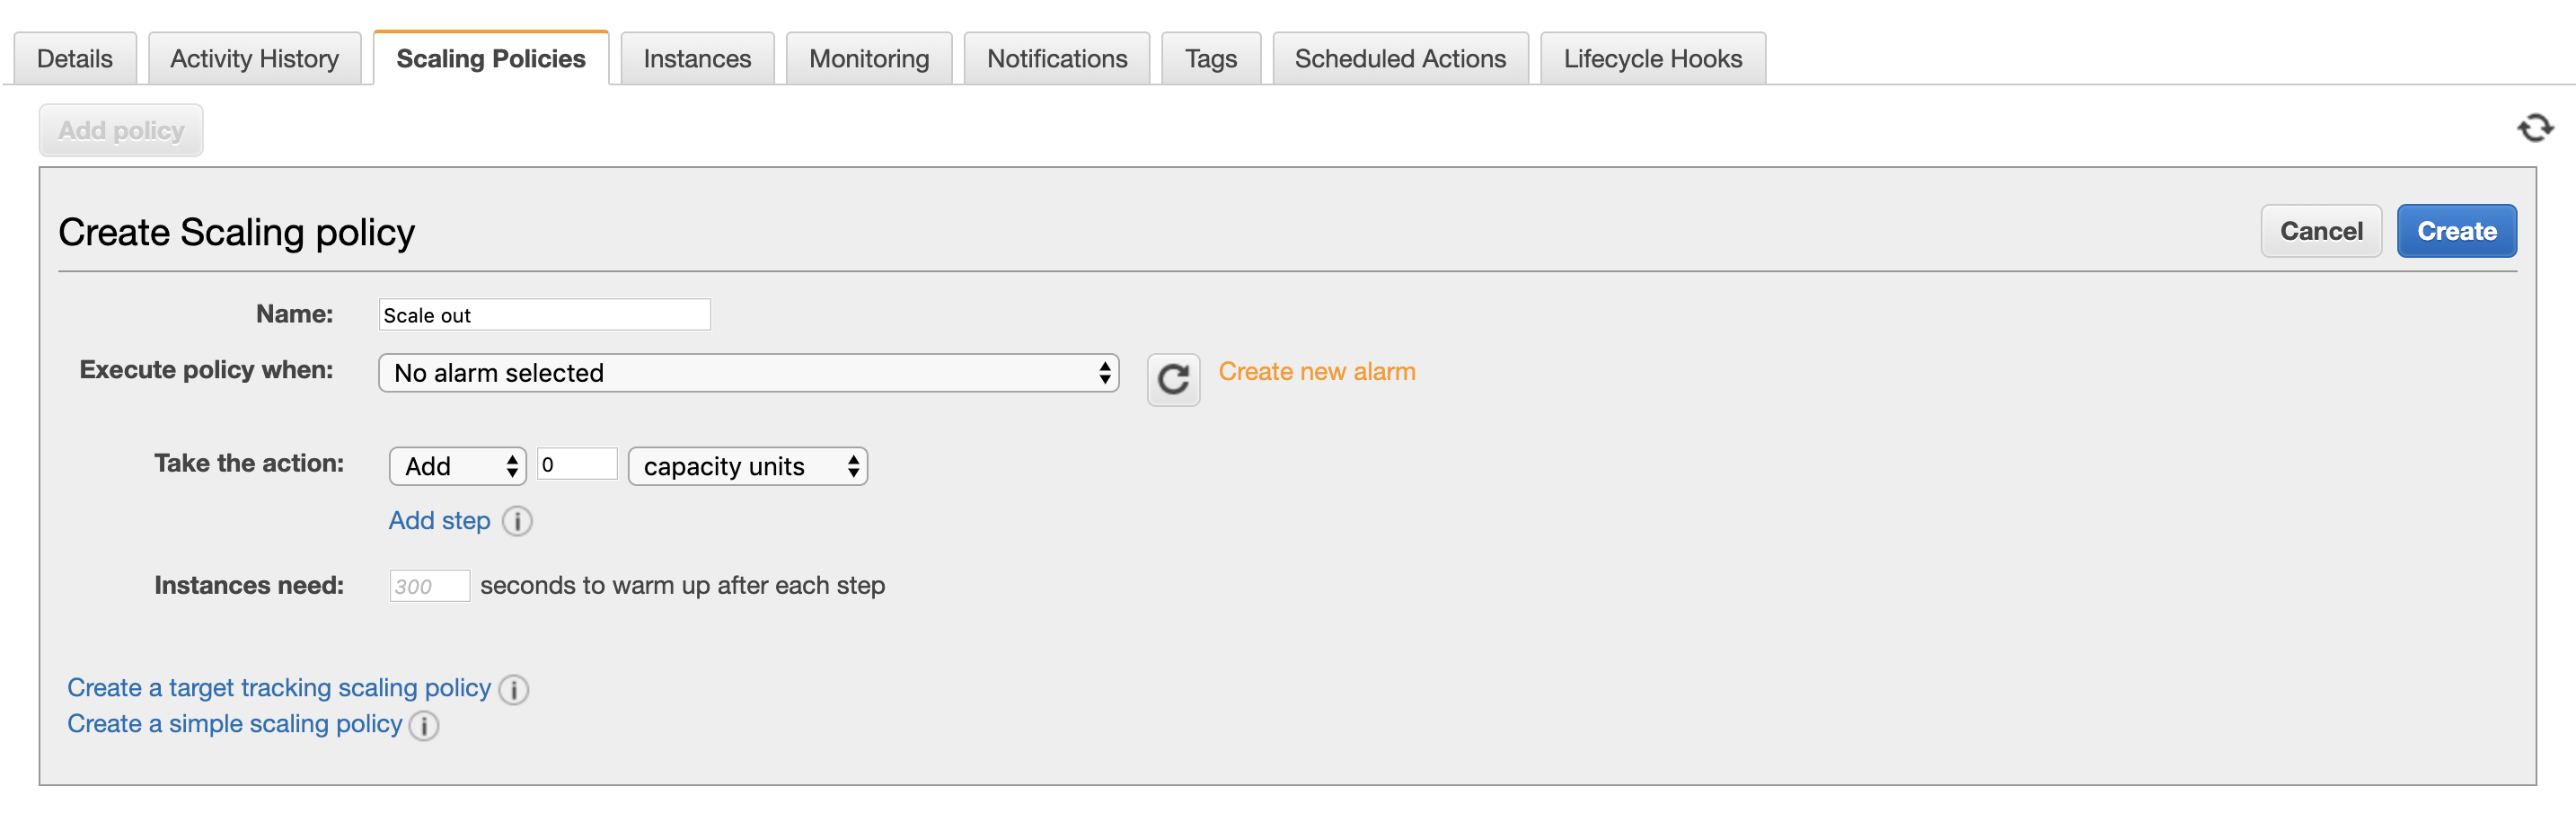
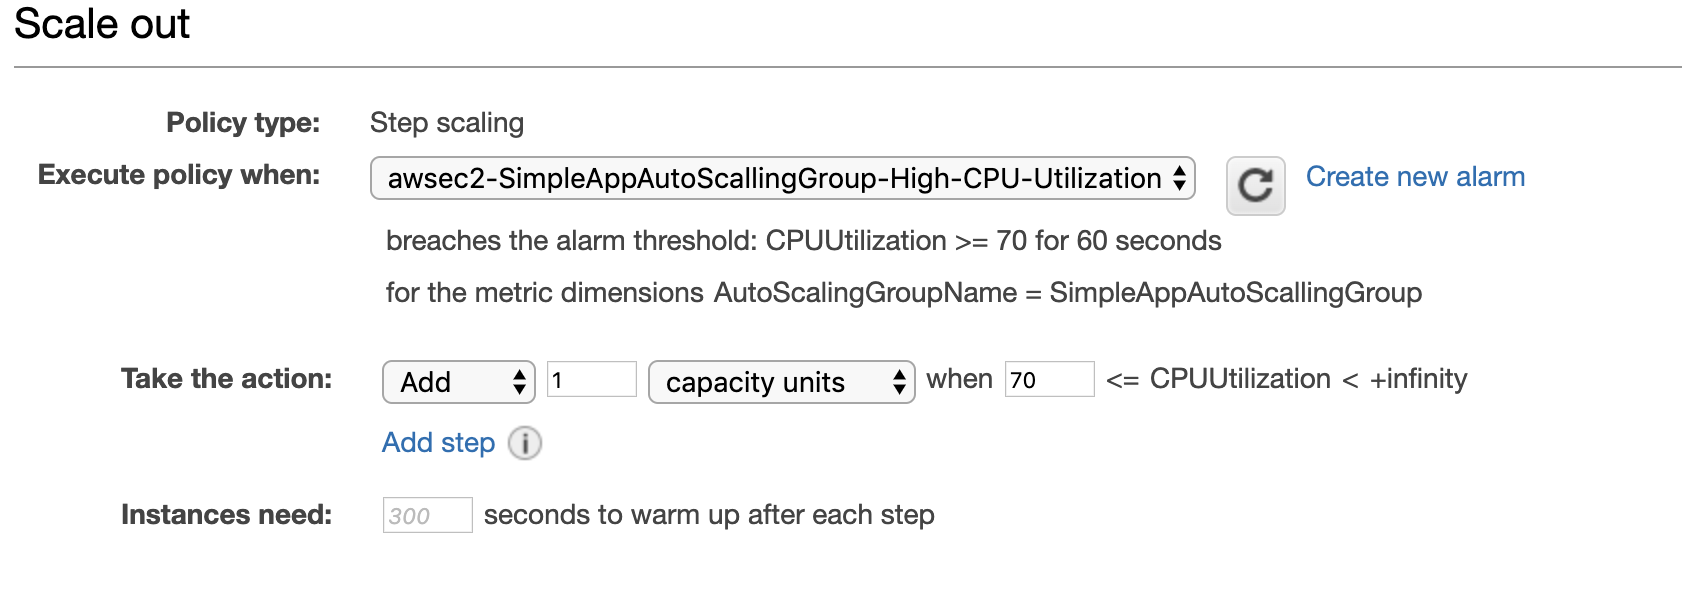
Here we create a new alarm. We are going to add 1 instance every time when CPU utilization runs over 70%.
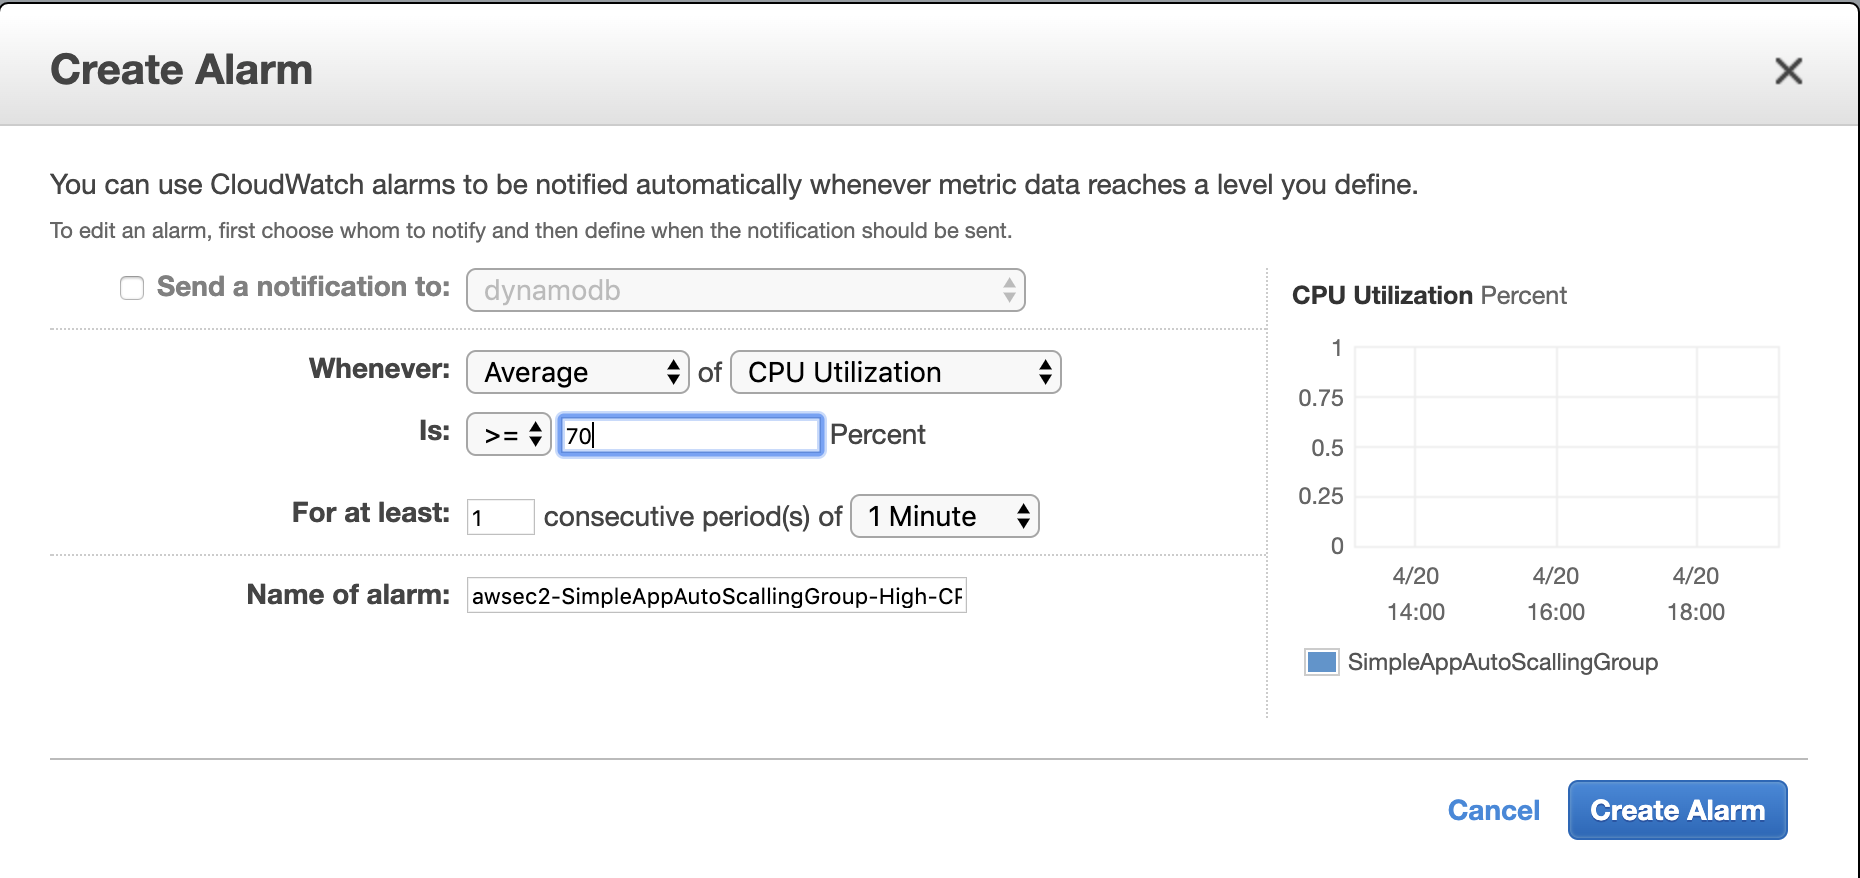 With this alarm, rule should add 1 instance. Let’s call the rule scale out.
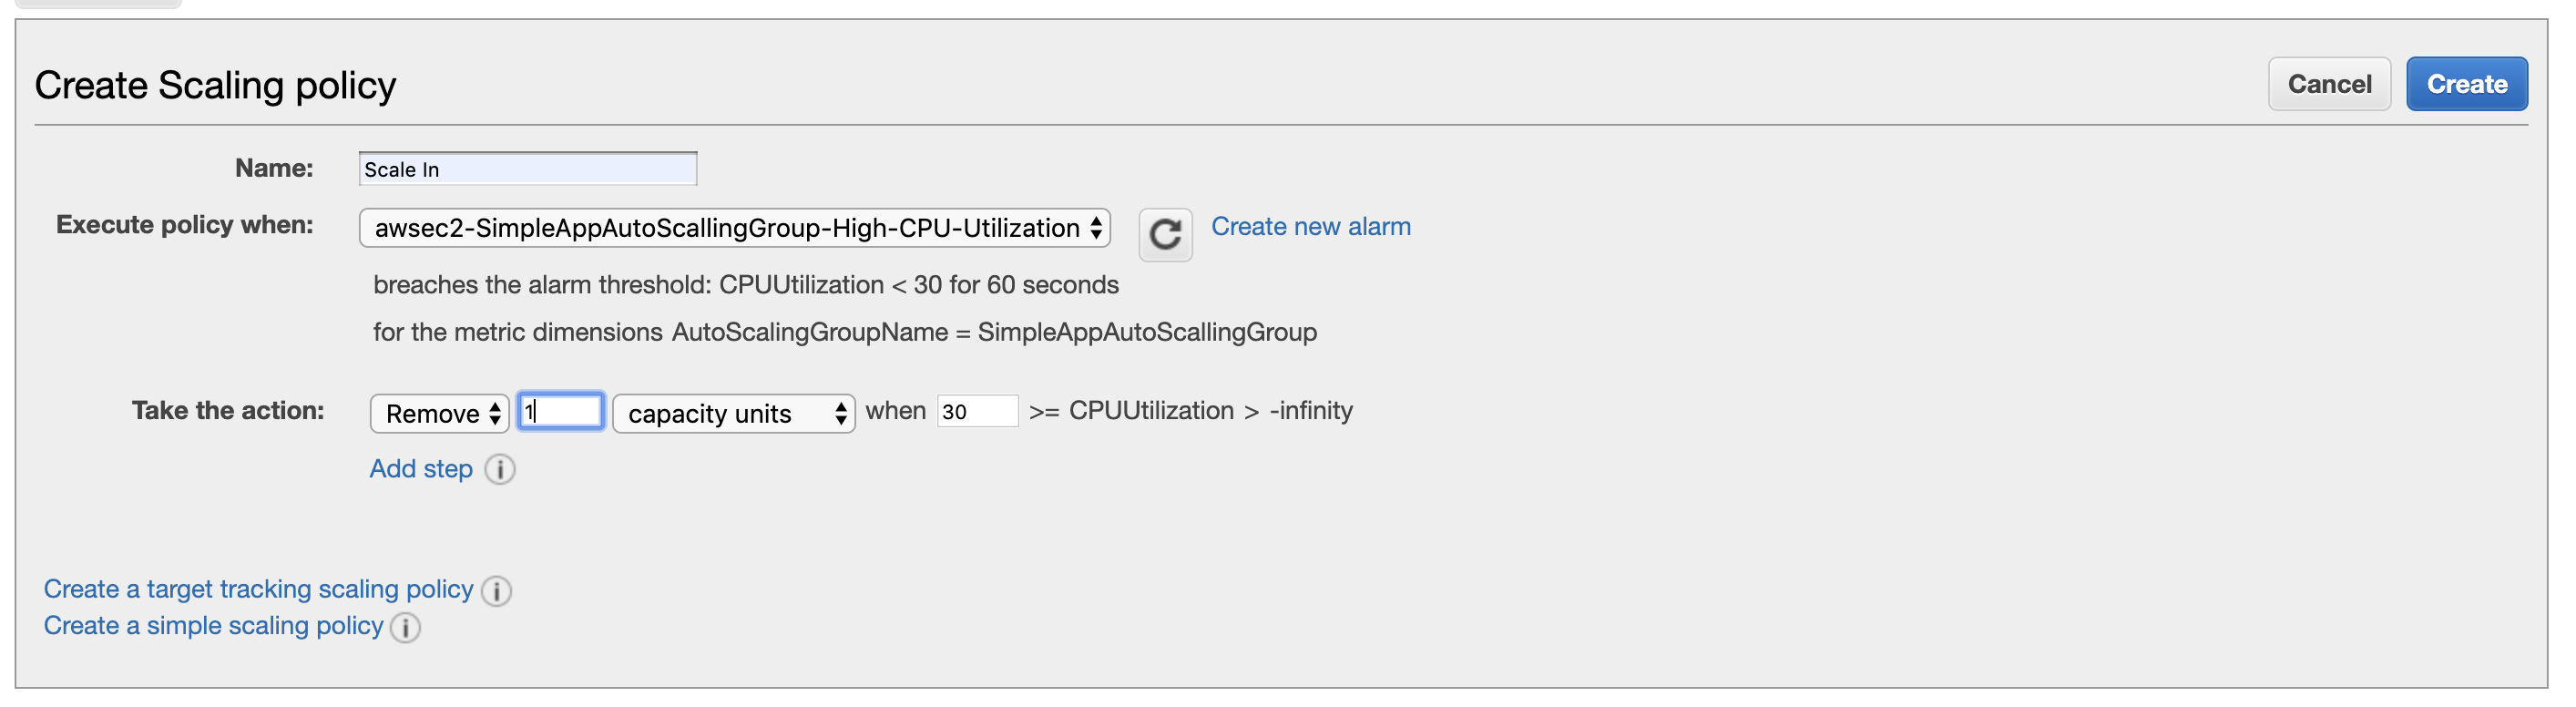
Let’s make the same steps for opposite direction, we use the level of 30% CPU usage to remove one instance from the group:
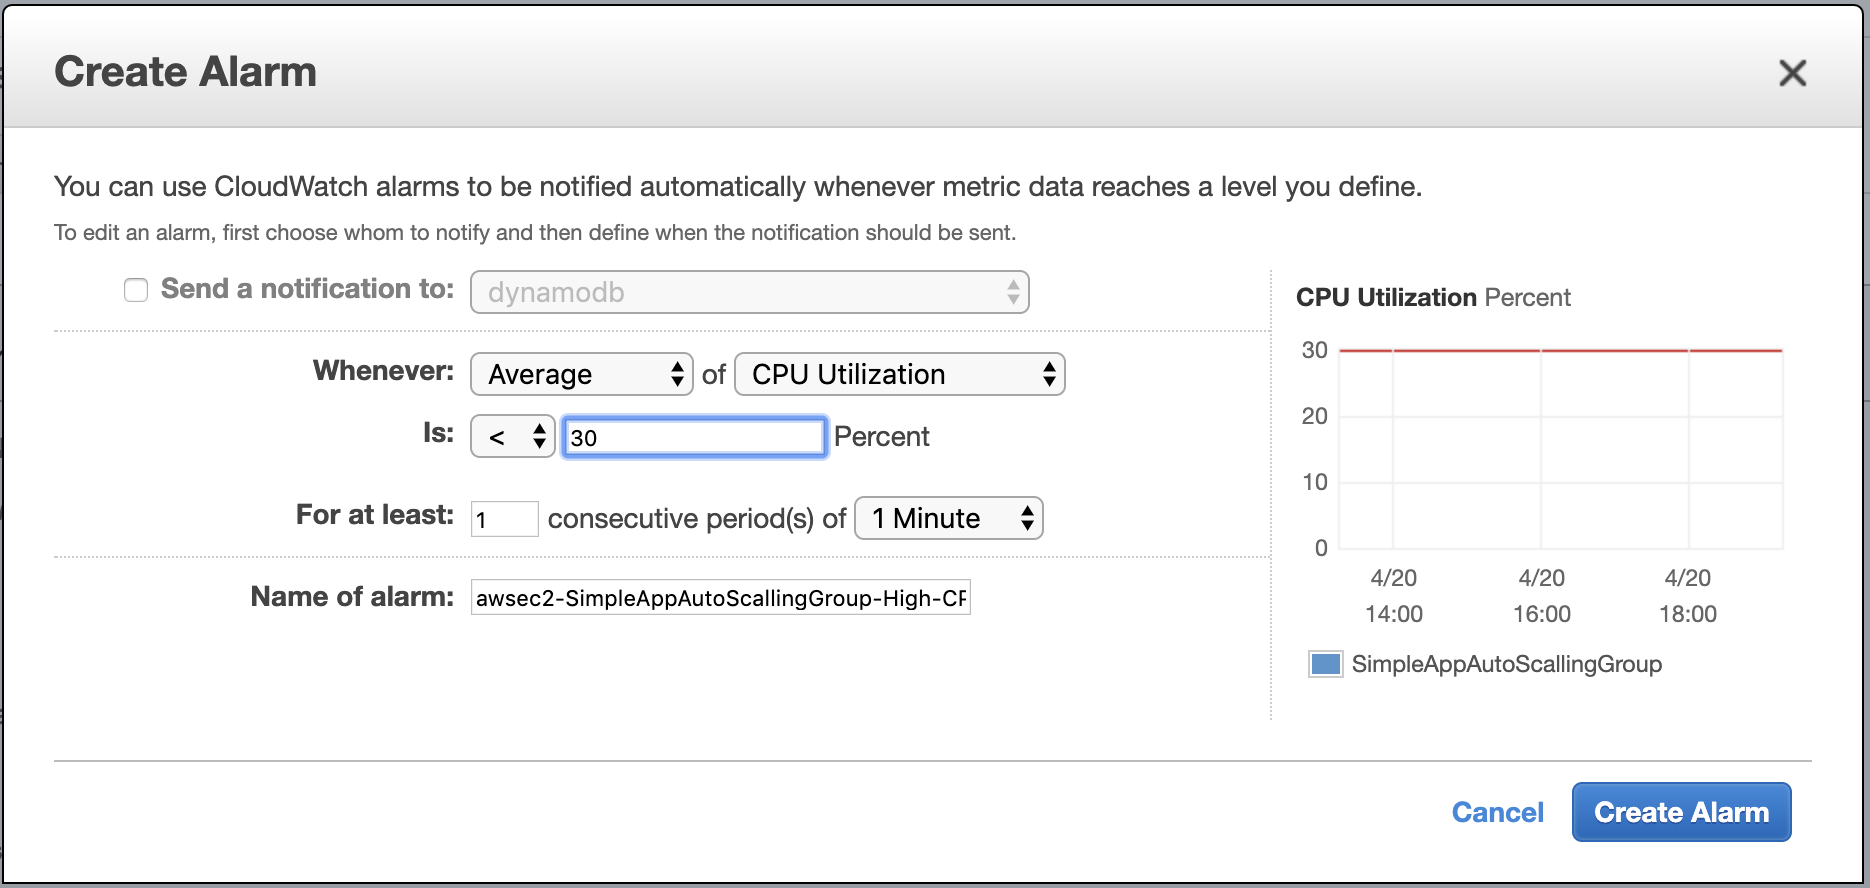 I have named it scale in.
Hurray! Now, our super EC2man is ready for the challenge.

Let’s brake it
OK, the time has come. Let’s load!
We already have 2 instances configured as a desired number of instances. If navigate to
/load/120/80
in two tabs of the browser, every instance would get the load above the configured scale-out rule. In this case, EC2man either give up, or ask
someone for help.
While our “killing tool” is trying to kill (pure tool), we can check the monitoring charts of the instances in the group, they should look
something like that:
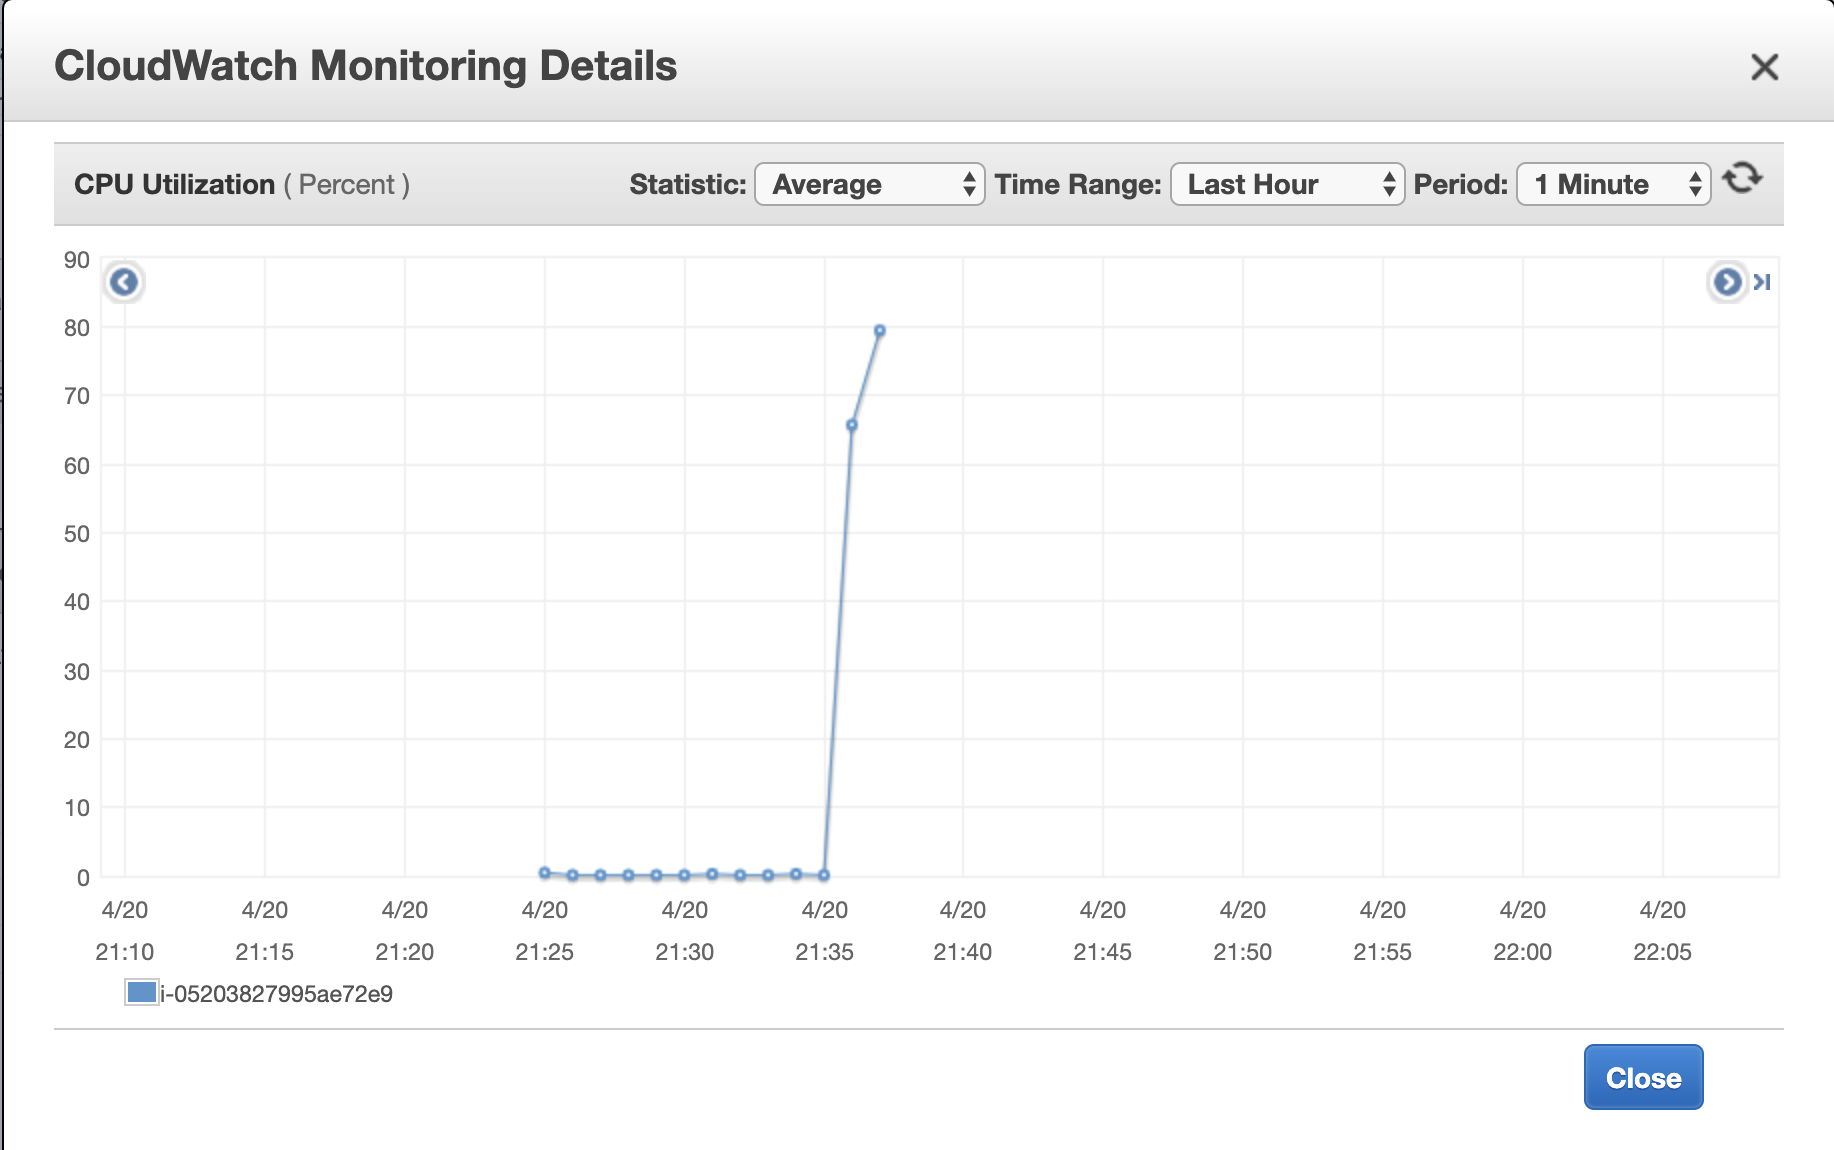
Well, what happens next - a predictable result:
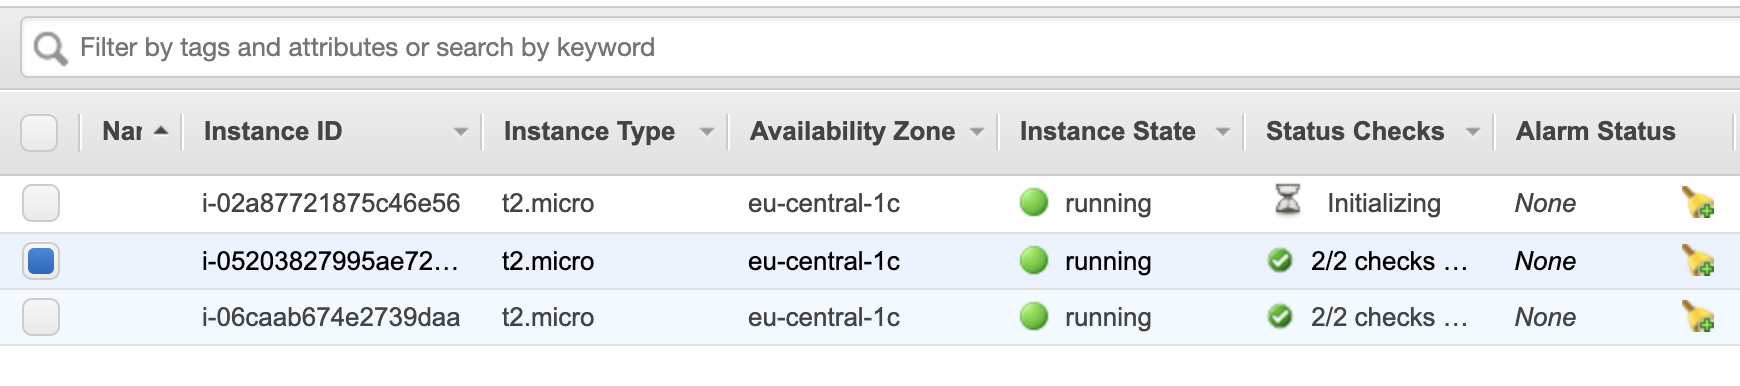

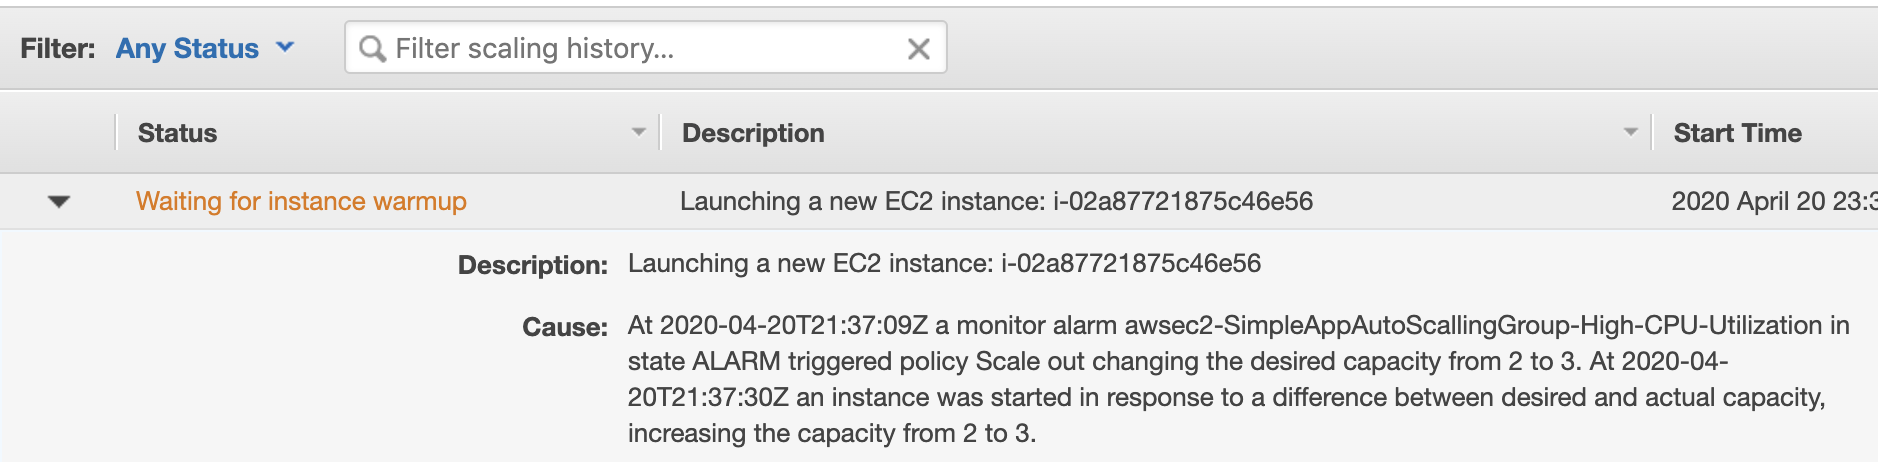
The help has come…

The 3d instance was acquired and started up.
Well, let’s do this trick once again with 3 tabs simultaneously loading our group.
After a while, you should see that the 4th instance is added to the group.
Huh, let’s breathe out for a while. And wait for how the group will be asking redundant power to go away. Having 4 instances, that would require at least 4 minutes (alarm configured to use metrics once per 1 min).
Sticky sessions
And while waiting for this let’s make an experiment with the last piece of the puzzle. Try to navigate to the
/session
and refresh the page a few times. You can notice that the successful response changes times to times to the failed response (401).


This happens because of the load balancing among different servers, but our session registered only one of them, on the first we accessed.
This usually brings a bad user experience as the user required to login in the middle of his working process with the application.
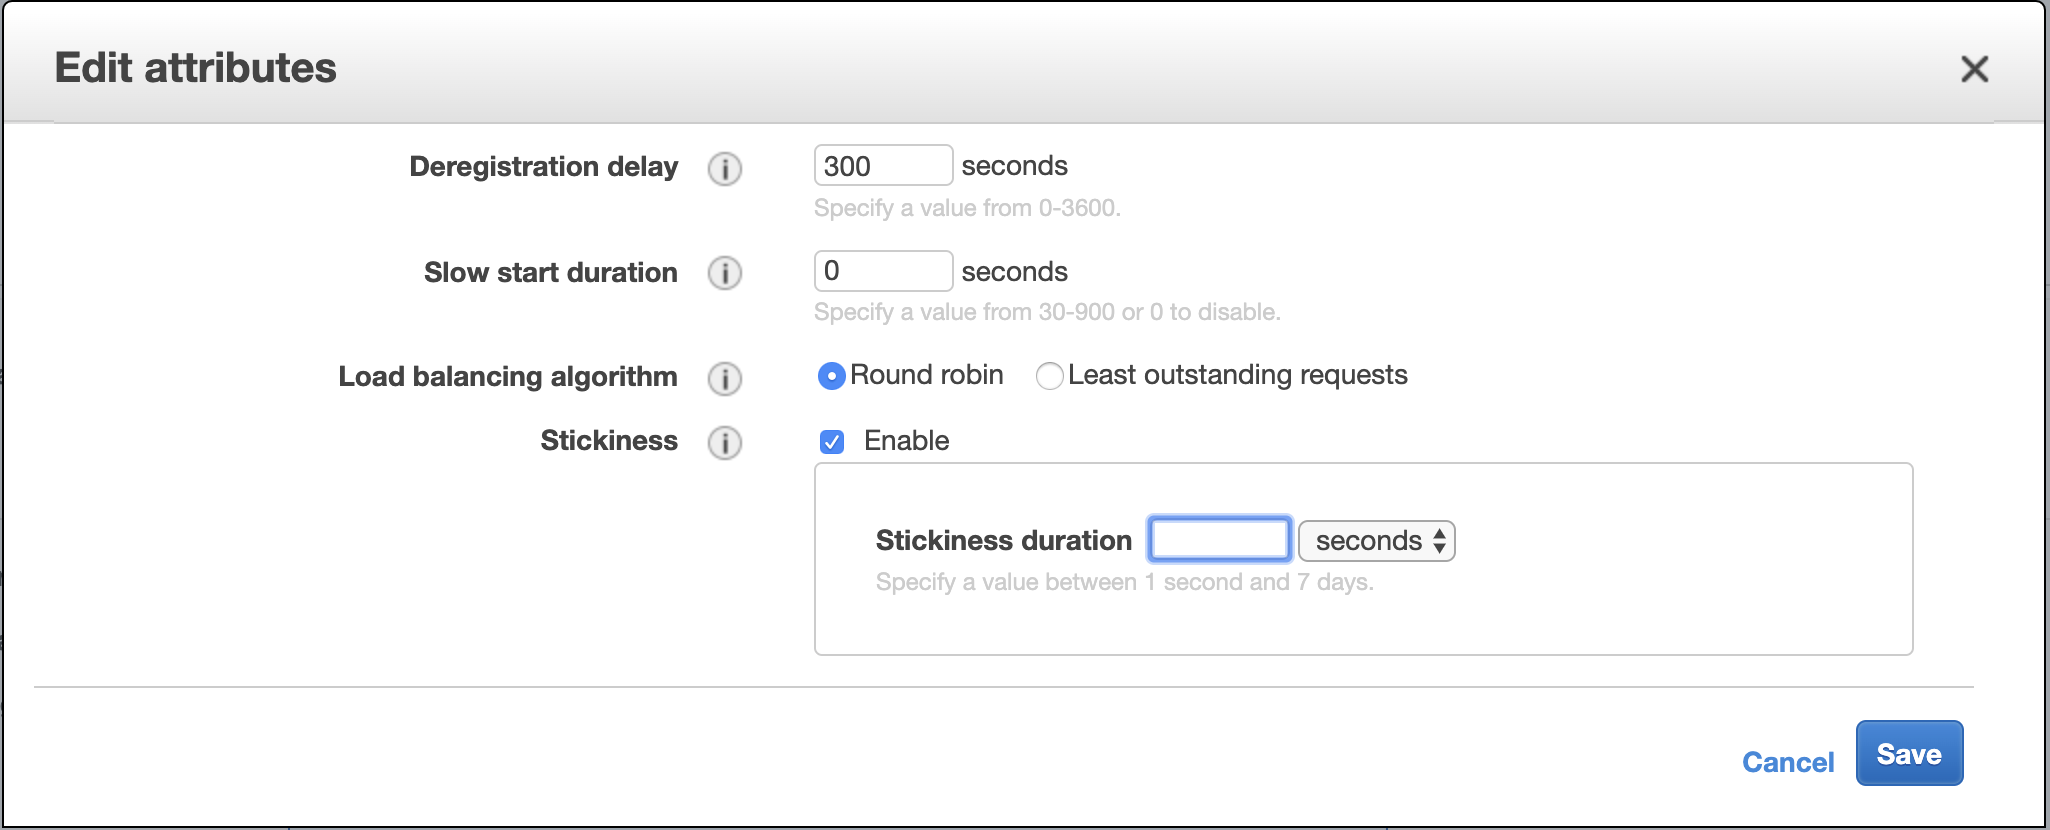
To avoid this we can use the nice LB feature sticky session. Unfortunately, Amazon Application LB allows to do it only with its custom cookie
variable for configurable time-frame, but this is anyway better, then nothing (Classical LB allowed to set the custom name for the variable,
which allowed using just the session cookie making HTTP session in sync with LB).
Well, let’s navigate to the target group of the LB and edit it:
And try our session URL a few more times. Now, you would get the same message all the time. You stick to the specific instance by LB.
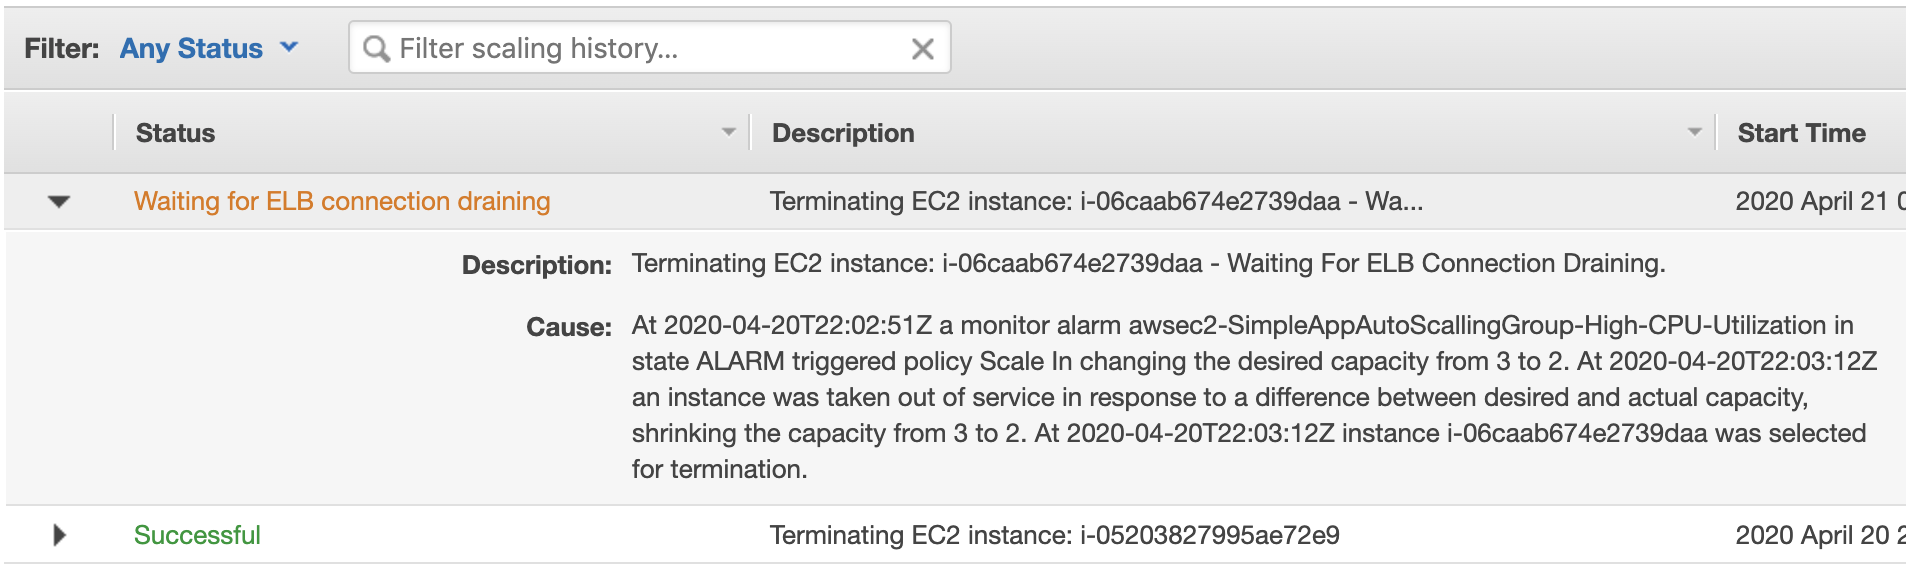
Tear down the instances
But let return to the instance, the number of them should decrease to the original amount:
Conclusion
AWS LB + EC2 + autoscaling is hard to consider a simple setup. But AWS tried to make them well integrated into each other and they
actually work very well together. Besides I didn’t put to the tutorial dozens of specific cases and settings which are available for
more sophisticated configuration, which makes it a really powerful tool.

Congratulations to all the brave heroes who read to the end. It was not easy, but I hope at least interesting. Thank you for reading this epic tutorial about a well-known thing.
Author Relaximus
LastMod 2020-04-18